Last weekend I spent a lot of time grinding on the floorboards again, I removed all the rust, then sealed it with a rust encapsulation spray from Permatex.
I found one more rust hole that I'll need to patch where the floor panel reaches the back seat. Fortunately the floors themselves didn't have any additional deep rust areas.
Next major step is to cleanup the undercarriage, 'derust' that and then seal it. The first step was to remove the gas tank. If you've not tried to remove the gas tank on a fox body mustang or Capri, it is surprisingly easy.
The rear is already up in the air, with jack stands under the axle, so it was pretty obvious what I needed to do.
First step was to spray the heck out of the two bolts holding the straps to the frame with PB Blaster. These are above the back of the tank. I then used a breaker bar to loosen both enough that I was comfortable I could reach them from the side of the tank with a regular ratchet instead of being underneath so I can put the jack under there.
I then put the jack with a 2x6 under the tank and also put a pair of jack stands on the outside edge just in case. After remove the bolts I lowered the tank slowly about 6" and disconnected the fuel lines and level sensor. Unfortunately I couldn't get the quick release fitting on the pressure side off, so I had to cut it. Luckily this is a short piece of hose to the other fuel pump so it won't be too expensive to replace.
(Even after I got the tank on the ground I couldn't get the fitting off. Yes I have the right tool, it was just so encased in crap it wouldn't move.)
I then 'wiggled' the tank to the left to remove the filler neck from the tank. Looking at the filler neck I'm going to have to clean up or replace that since it is full of rust too.
I then stuck a tennis ball in the opening and put it outside. Tomorrow I'll drain the rest of the 5+ year old gas and figure out what to do with it.
Last step was to use a small magnetic pick up tool to remove the pins in the straps and take them out.
I crawled underneath and looked around. So far no really bad looking rust.
Next step: drop the rear suspension. That is going to take some work!
Wednesday, June 24, 2009
Sunday, June 14, 2009
Passenger side floor pan cleanup
This morning I started on the passenger side floor pan. From the 'before' picture is looks really bad and I was worried how much rusted through all the way. I crawled underneath and found only one spot where the rust had gone through.
Hitting the back seat part with the wire brush, sandpaper, wire wheel and angle grinder I removed a lot of the rust and figured out how big the rusted through area really is. It is about 3" long by 1/2" thick. (top right of the picture) I haven't hit it from below yet, so it might grow (sorry, no 'during pictures, it is nowhere near done.)

After about 40 minutes on my knees I had to take a break and work on something else. I first removed the sun visors, then took the front bumper, radiator and A/C condenser off. Both the Radiator and condenser show signs of damage, so I'll probably need to replace them as well.
The frame holding the Marcal lights has a serious bend in it, but it the lights are straight in the frame. I think this can be hammered out based on what I've seen others do.

I also cleaned up the rust on the drivers frame rail and got a good look at how bad it is. I'm still committed to fixing this car ;-)


Hitting the back seat part with the wire brush, sandpaper, wire wheel and angle grinder I removed a lot of the rust and figured out how big the rusted through area really is. It is about 3" long by 1/2" thick. (top right of the picture) I haven't hit it from below yet, so it might grow (sorry, no 'during pictures, it is nowhere near done.)
After about 40 minutes on my knees I had to take a break and work on something else. I first removed the sun visors, then took the front bumper, radiator and A/C condenser off. Both the Radiator and condenser show signs of damage, so I'll probably need to replace them as well.
The frame holding the Marcal lights has a serious bend in it, but it the lights are straight in the frame. I think this can be hammered out based on what I've seen others do.
I also cleaned up the rust on the drivers frame rail and got a good look at how bad it is. I'm still committed to fixing this car ;-)
Sunday, June 7, 2009
What is the car supposed to look like?
I've been asked a lot about what color I'm going to paint it. If I want to keep it original, it will look like this:

(I probably will) Looks cool doesn't it?
(I probably will) Looks cool doesn't it?
Rear seat rust cleanup
I didn't get a lot done this weekend. Kind of busy Saturday throwing a surprise 40th birthday part for my wife. It was almost a month before her birthday so she had no idea it was coming.
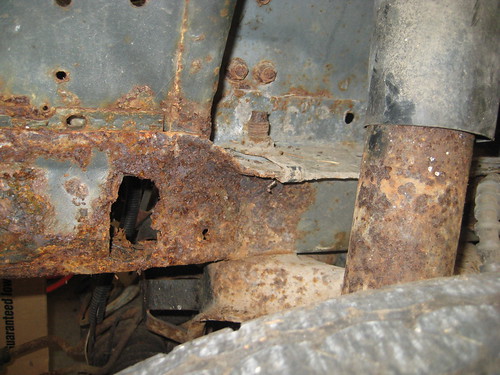
I was able to start on the rear seat area. The drivers side had some odd rust. It looks like the torque box is to the right of the hole, but the metal doesn't seem to be welded there? One more strange thing to clean up.

Here is what the passenger's side looks like all cleaned up.

Next week, I start on the passengers floor board. Uggh:

I was able to start on the rear seat area. The drivers side had some odd rust. It looks like the torque box is to the right of the hole, but the metal doesn't seem to be welded there? One more strange thing to clean up.
Here is what the passenger's side looks like all cleaned up.
Next week, I start on the passengers floor board. Uggh:
Subscribe to:
Posts (Atom)