Friday, December 25, 2009

Christmas 2009


Here are a few of the parts or tools I received as presents this Christmas. My Dad bought the Dura-Block and the Eastwood pry kit. My mom got the small screw driver set from Sears and my brother Pat bought the interior screw kit from FMR!

My Dad's comment was classic: "I saw them on your wish list and figured since all you used to buy me was tools, I'd return the favor!"

Nothing new on the Capri, kids, school and work have taken priority the past few weeks. I plan on doing some front end removal this week if the weather is nice.

Sunday, November 29, 2009

Frame rail, we don't need no stinking frame rail!


Yes, that is my frame rail.

After a frustrating day last Friday, today I made a lot of progress on the car. First I was able to remove the lower control arm bolts that were seized. Heated them up for about 45 second each and they came right out with the impact.

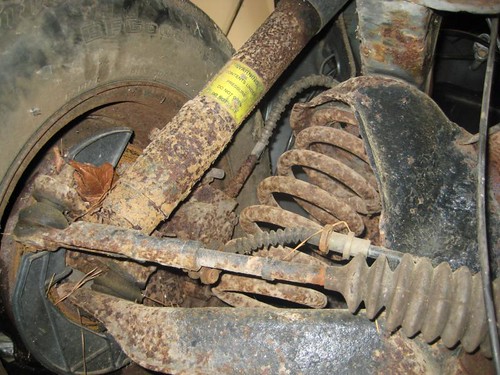
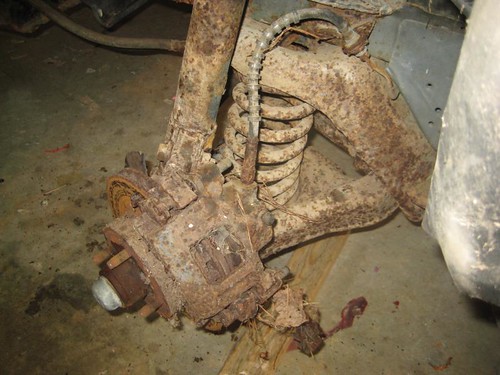
The spring was a little more difficult because the sway bar and slapper bars are still on the control arm and rear end respectively (seized, for now ;-). I eventually removed the shocks and the rear end settled down enough that I could pull the spring out. Five minutes later, the rear end was on the ground.


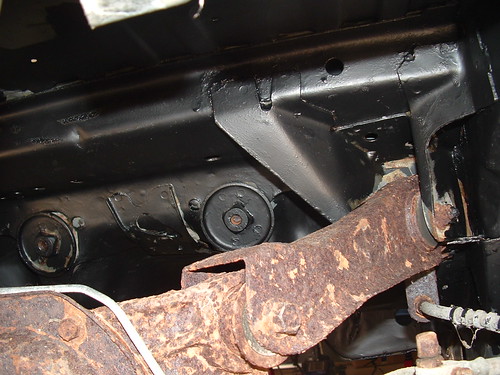
I then moved to the rusted frame rail. I was able to cut through a bunch more spot welds until finally I broke out the sawzall and cut through the mounts at the radiator support. They were so rusted I wasn't able to find where the original welds were.

As you can see, there was no chance to 'patch' this rail. It is rusted through in several spots.


Here is a shot of the rail over the k member. I don't know for sure if I need to replace the whole rail or just cut out this inner piece and weld some new steel to it. Advice?


It is also obvious I need to replace part of the radiator support.


Next steps are to get the rear end cleaned up, painted and new brakes put on. Then start on so getting it rolling is probably a good next step.

Friday, November 27, 2009

Thanksgiving update

The fall was mostly taken up with torrential rains, floods, Softball and Color Guard, so I didn't get to do anything until this weekend.

Last time I worked on the car I dropped the driver's side rear lower control arm and spring to begin cleaning up that part of the car. I then had the good idea to remove the axles to make is easier to remove the brake backing plate to clean and paint it. Well, two different days, lots of different techniques (including a torch!) I gave up. I guess I'll work around the axles.

I also figured it would be easier if I dropped the rear end completely, moved it out from underneath the car and then work on the underside of the car and the rear end with much more room. Except the passenger's side lower control arm bolts won't move. Lots of PB Blaster, impact wrench, breaker bar with a 4 ft pipe. Nothing worked.

So, I gave up on the rear end of now.

Instead I removed the steering wheel and dash. Two reasons. First to make sure there was no 'rot' under the cowl (a very common problem on Fox bodies) second to get access to the Heat/AC box. I am going to change the heater core and A/C condenser before I put everything back together. Both are of questionable quality after sitting for so long, so I'd rather replace them than take the chance. I haven't replaced them yet.

Next I started removing the front brake lines since I need to rebuild the front suspension before the car can be moved. Most everything here is rusted together. I couldn't get the brake bleeders free nor remove the brake lines from the calipers. So no progress here.

I did however begin removing the rusted frame rail. I bought a spot weld cutter a couple of weeks ago and today started removing the welds. I was able to do about a dozen before I ran out of time. More tomorrow!

Sorry there are no pictures, but as you read, I haven't actually finished anything lately.

Monday, September 7, 2009

Rear Upper Control Arms!

I was able to take advantage of the long weekend and make some progress on the Capri.

First I removed the rear brake lines, up to the firewall. One was already cracked and there was no fluid left, so it wasn't as messy as it could have been. I also tried to drain the front brakes, but the bleeder screws are so rusted to the caliper that they wouldn't budge. I sprayed them a couple of times with PB Blaster so I'll try again next weekend.

Next was to work on the rear suspension again. I bought replacement bolts for the upper and lower control arms from UPR . Of course I didn't notice that there were different size bolts for the upper and lower until AFTER I had put the passenger side back on. However by this time I had figured out how to place the jack under the pumpkin part of the rear end (instead of the cover) and the bolts came out and back in really easily.

Passenger Side:


Drivers Side put back together:


Passenger side put back together:


I cleaned up the driver's side upper control arm and also painted it the gray 'hammer' color. While I had the upper half apart, I also cleaned up the top of the rear end and both axle tubes to the lower control arm mounting points.

My wife found it funny that I was filthy so she took this picture. I had a mask and full eye protection, so no worries about having breathed in all that crap.


To end the weekend I removed the lower control arm on the driver's side to start cleaning that up. That was a pain in the ass. Thank goodness for air tools, but I still couldn't get the axle side bolt out. It wasn't rusted, it was binding on the rear end. After about 30 minutes I finally got it out, but cut my hand on the pumpkin when it finally came free.

Next steps are to continue working on the driver's lower control arms, cleaning up the rust and painting it and the springs.

Sunday, August 23, 2009

Hammer (paint) time!

I haven't had a lot of time to work on the car this month. Too many things for the kids and Deb.

Last weekend I had a couple of hours to work on the car and remove the passenger upper control arm. Thank god for air tools. 25 year old bolts don't want to come off!

The reason I took it off was to get access to the torque box to de-rust it and paint it. There was a little bit of surface rust which came off easily. I put the Eastwood Rust Encapsulator on the whole box and let it dry.

This weekend I had a whole 2 hour to work on the car. So I painted the torque box with 'hammer' paint from Rustoleum and painted the control arm as well. No pictures yet, but I will take them when I put that side back together.

If you've never used this paint before, be warned. At first it looks like the paint is 'lifting' and running off, like you didn't prep the metal correctly. Don't panic like I did ;-) But after a few minutes it starts the show the 'hammer' texture.

The other hour I had today was used cleaning out more of the undercoating from the car. I got a lot from the body seams out, but didn't touch the wheel wells. I need to research how to remove that much surface area.

One new item about the garage setup. With the kids back in school, I've lost Deb's side of the garage as temporary storage. So I'm doing a full clean up each time I do any work and put away everything so she can get the van in the garage.

Next weekend I'll put the passenger control arm back on, take the driver's side off and do the painting all over again.

Slow and steady ...

Monday, August 10, 2009

New doors and Techie details on the car

I bought two new doors for the car this weekend. They are from a 86 Mustang with the 'aero' moldings instead of the black and pinstripe. Luckily I can change the moldings. The doors are from a power lock/window car, but I'll convert them to manual to match the original.

Why new doors? Well, for $50 they have no rust. The current doors are shot, typical of a New York car. Plus the labor to clean up the surface rust will be way more than $50.

I haven't done much else on the car. Many commitments with the kids taking priority. They started school today, so maybe I'll get some time this weekend.

I thought I'd posted this before, but here is the 'decoding' of the buck tag and VIN:

VIN
1ME = Mercury, USA
B = manual seatbelts, no airbag(s)
P = passenger car
79 = Capri three-door sedan (hatchback)
W = turbocharged 2.3L engine
5 = VIN check digit
E = 1984 model year
F = Dearborn Assembly (DAP)
606840 = 6,840th 1984 Capri assigned a VIN at DAP

Body/Buck Tag
CAPRI = model line
606840 = last six of VIN
61D = Capri three-door sedan (hatchback)
W = turbocharged 2.3L engine
0463
9W = Dark Charcoal Metallic exterior
RS
DF
ST
AC = air conditioning
06
HB = rear defrost
S = cruise control
TRS = Turbo RS
MBW = T5 transmission
04 = hood scoop
-A = Charcoal interior
EI = electronic fuel-injection
NLR

Vehicle Certification Label
EXT. COLORS - 9W = Dark Charcoal Metallic
DSO - 84 = "Home Office Reserve" district sales office
BODY - 61D = Capri three-door sedan (hatchback)
INT. TRIM - PA = cloth high-back bucket Functional Sport Seats (P), Charcoal (A)
A/C - 1 = tape stripe color
R - check again for radio code
S - [blank] = no sunroof or T-roof
AX - R = 3.45:1 axle ratio w/ Traction-Lok differential
TR - 2 = T5 transmission
0000 - check again for front and rear coil spring codes

Sunday, July 19, 2009

Seat pictures, strange fenders?

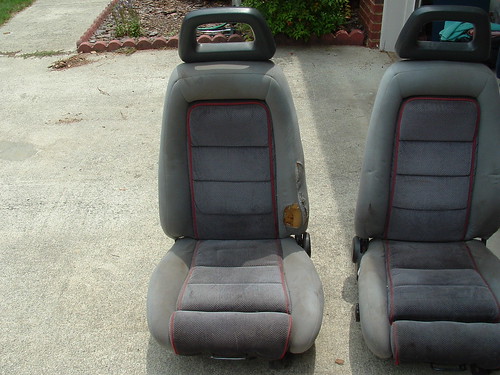
Not a lot of progress on the Capri shell lately, but I finally found some seats for the Capri. The 84 seats are impossible to find for some reason, but I've seen (and bid) on a number of 85-86 seats. Most were expensive plus shipping, so I was looking locally first before committing to an auction. Found these on Craig's List. Local in pretty good shape.


Drivers seat isn't that bad.


The big difference between these and the 84s are the piping in 84 was blue and 85+ was red. Yes I can get seat foam and replacement upholstery, but at least now I'll have something to sit in!

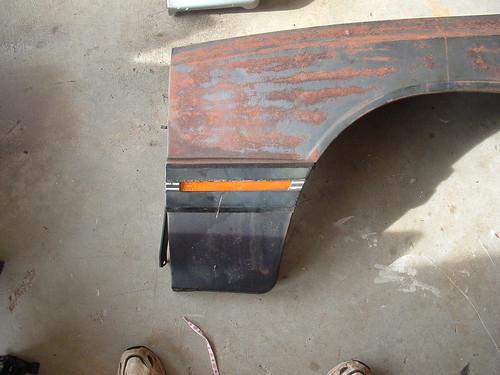
The second Craig's List find was a pair of excellent condition fenders for a Capri. I paid $100 for them and I figure I'd spend way more than that repairing the surface rusted ones I have now.

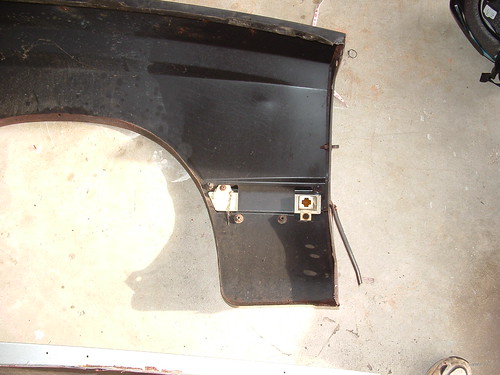
However, these are strange. The guys said they came off a Mustang that someone had put them on, but if you look closely there is no cutout in the left front part for the turn signal. If they are original's put on another car that area would be cut out. Weird.

New:


Original:


Both in same picture:


From Behind. Silver:


Original:

Saturday, July 4, 2009

Cleaned up the floor!

I finished a major task on the Capri today.I have removed all the rust from the floorboards and most of the undercarriage (except the driver's rear seat which I need professional help with).

First are the before pictures:

Passenger side front

Passenger side rear.

Driver's side front from below:

Driver's side upper torque box

Passenger's side upper torque box


I did a lot of sanding, grinding and generally making a mess over the last couple of weekends. Today I sealed everything up that I worked on with Eastwood's Rust Encapsulator. Pretty good stuff by the look and coverage. Not as messy as I expected, but I did have to wear a mask to keep the fumes out. I went and bought one specifically for solvents from Home Depot.

After:

Driver's floorboard:


Passenger's Front. Yes really that is the same panel after hitting every inch with a grinder or sandpaper!


Driver's side torque box. Note, the goal here wasn't to cover everything, just the areas I had sanded or where there was visible rust. Since the control arms are still on the car, I couldn't get all of it. I'll finish that up when I drop the rear to replace all the bushings.

Passenger's side torque box.


There are a few more pictures on the Flickr site if you're interested.

Next steps are a little hard to know right now. I am going to have a professional look at the front frame and decide what is next. I keep hearing it is repairable, I just don't know how much or what I can be doing in parallel while waiting to get it done. Hopefully I'll have someone look at it next weekend.

Thursday, July 2, 2009

Rust, July 2nd

Note to self (or anyone doing this themselves): clean the underside of the car before you start grinding on the rust. I swear the mess was because of all the dust, dirt and oil, not just the rust.

Since this is a long holiday weekend, my company let everyone go at 3 pm to start the weekend early. I immediately went to Home Depot and bought more wire wheels and sandpaper to work on the Capri.

First step was to jack the front of the car up and get it on the jack stands. I then took all the wheels except the passengers front (still won't budge!) to give me more room.

I then spent the next 3 hours sanding, grinding, using scotch brite pads on the undercarriage. I removed the fuel lines since they were in the way. I only found one more hole, in the passenger's foot area, about the size of a dime. That's the fourth 'dime size' hole I've found so far. I need to figure out what to do with these. I know cutting out the rust and welding in new steel is best, but for an area that small I wonder if there aren't other ways.

There are still a few areas that I can't get to because of the rear suspension, so I'll work around them tomorrow and deal with them when I drop the suspension and remove the rear end.

Task for tomorrow: degrease and clean the whole undercarriage then put the rust converter on the bad spots, finally putting the rust encapsulator.

Wednesday, July 1, 2009

More rust cleanup

I didn't get anything done last weekend. My brother Pat came into town Saturday morning so I was pretty much out the whole time.

Monday night I took the gas tank into the woods behind the house and flushed the interior with water (all the gas was removed before this!) to get rid of any remaining fumes. I also took off the second fuel pump and fuel filter, including a really badly rusted bracket.

Tonight I started grinding the surface rust off the undercarriage of the car. I was able to get to a lot of the rust, except a few places where the rear end prevented me from getting the drill up there. Mostly around the upper torque boxes.

I decided not to drop the rear end yet, since I'd really rather have some help for that than risk something going wrong. So, for the rest of the week I'll be removing rust from all the floor pans and the rest of the torque boxes, probably with sandpaper.

After that I'll paint some rust converter on the 'bad' areas and cover everything else with the Rust Encapsulator from Eastwood.

Wednesday, June 24, 2009

Dropping the Gas Tank

Last weekend I spent a lot of time grinding on the floorboards again, I removed all the rust, then sealed it with a rust encapsulation spray from Permatex.

I found one more rust hole that I'll need to patch where the floor panel reaches the back seat. Fortunately the floors themselves didn't have any additional deep rust areas.

Next major step is to cleanup the undercarriage, 'derust' that and then seal it. The first step was to remove the gas tank. If you've not tried to remove the gas tank on a fox body mustang or Capri, it is surprisingly easy.

The rear is already up in the air, with jack stands under the axle, so it was pretty obvious what I needed to do.

First step was to spray the heck out of the two bolts holding the straps to the frame with PB Blaster. These are above the back of the tank. I then used a breaker bar to loosen both enough that I was comfortable I could reach them from the side of the tank with a regular ratchet instead of being underneath so I can put the jack under there.

I then put the jack with a 2x6 under the tank and also put a pair of jack stands on the outside edge just in case. After remove the bolts I lowered the tank slowly about 6" and disconnected the fuel lines and level sensor. Unfortunately I couldn't get the quick release fitting on the pressure side off, so I had to cut it. Luckily this is a short piece of hose to the other fuel pump so it won't be too expensive to replace.

(Even after I got the tank on the ground I couldn't get the fitting off. Yes I have the right tool, it was just so encased in crap it wouldn't move.)

I then 'wiggled' the tank to the left to remove the filler neck from the tank. Looking at the filler neck I'm going to have to clean up or replace that since it is full of rust too.

I then stuck a tennis ball in the opening and put it outside. Tomorrow I'll drain the rest of the 5+ year old gas and figure out what to do with it.

Last step was to use a small magnetic pick up tool to remove the pins in the straps and take them out.

I crawled underneath and looked around. So far no really bad looking rust.

Next step: drop the rear suspension. That is going to take some work!

Sunday, June 14, 2009

Passenger side floor pan cleanup

This morning I started on the passenger side floor pan. From the 'before' picture is looks really bad and I was worried how much rusted through all the way. I crawled underneath and found only one spot where the rust had gone through.

Hitting the back seat part with the wire brush, sandpaper, wire wheel and angle grinder I removed a lot of the rust and figured out how big the rusted through area really is. It is about 3" long by 1/2" thick. (top right of the picture) I haven't hit it from below yet, so it might grow (sorry, no 'during pictures, it is nowhere near done.)


After about 40 minutes on my knees I had to take a break and work on something else. I first removed the sun visors, then took the front bumper, radiator and A/C condenser off. Both the Radiator and condenser show signs of damage, so I'll probably need to replace them as well.

The frame holding the Marcal lights has a serious bend in it, but it the lights are straight in the frame. I think this can be hammered out based on what I've seen others do.


I also cleaned up the rust on the drivers frame rail and got a good look at how bad it is. I'm still committed to fixing this car ;-)


Sunday, June 7, 2009

What is the car supposed to look like?

I've been asked a lot about what color I'm going to paint it. If I want to keep it original, it will look like this:


(I probably will) Looks cool doesn't it?

Rear seat rust cleanup

I didn't get a lot done this weekend. Kind of busy Saturday throwing a surprise 40th birthday part for my wife. It was almost a month before her birthday so she had no idea it was coming.

I was able to start on the rear seat area. The drivers side had some odd rust. It looks like the torque box is to the right of the hole, but the metal doesn't seem to be welded there? One more strange thing to clean up.


Here is what the passenger's side looks like all cleaned up.


Next week, I start on the passengers floor board. Uggh:

Saturday, May 30, 2009

First victory against the rust!
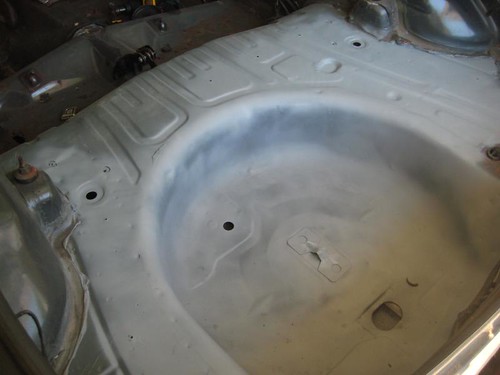
Today I finally started working on the rust in the interior of the car. I started at the back in the hatch area and I'm working my way forward.


Note that I didn't cleanup all the rust. I need to drop the fuel tank and snake those wires back through the floor before finishing. I was worried about hitting the wires with the grinder, so I'll come back to this.


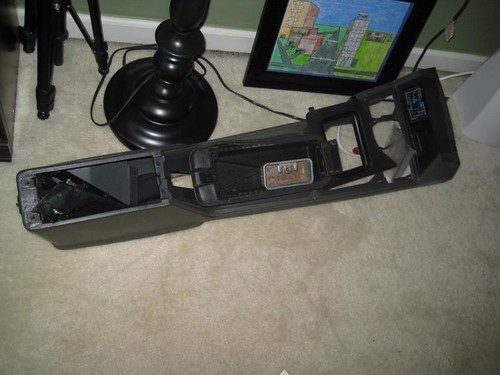
I also bought a replacement center console off a guy on corral.net. $135 shipped wasn't cheap, but it is the correct replacement part that the previous owner cut in half.

Tuesday, May 26, 2009

Memorial Day Weekend 2009

Well, I've started on the body work.

Actually I first finished removing the sound deadener. I ended up using a '6 in 1' painting tool which is thicker than a regular paint putty knife. Only a few pieces didn't want to come up easily, but after an hour or so all the black sound deadener was gone.

I bought an angle grinder, sanding/stripping disks, etching primer and some sand paper. Figured I'd start in the hatch area and the spare tire well.

An hour into it, I was really confused and frustrated. So I took a break ;-)

Turns out trying to grind on the irregular and curved surfaces is a pain in the butt. So I got out some sandpaper and eventually used naval jelly on some areas I couldn't get into. Naval Jelly is some interesting stuff. Put it on and a few minutes to an hour later the rust was gone. Clean it off, sand the area and you can primer it.

Of course the instructions said to put it on for 10 minutes. After 10 minutes, nothing changed. So I left it on for 20 minutes. Some rust removal. 30 minutes and it cleaned up pretty well. Except I only did an area about 6" by 6". So this isn't going to scale well if I can't do more than a few square inches every 30 minutes.

After about 4 hours of working, I had cleaned the spare tire well, sanded it down and shot it with the primer. Not a lot of progress for a lot of hours, but I know what I'm doing now ;-)

Most of the rest of the weekend was taken by family events, projects and my 17th Wedding Anniversary (She wanted to see Star Trek, so who am I to argue?).

I did spent a few hours Monday morning organizing the shed where I'm keeping all the parts. All the big stuff is now in the shed and I can get to the lawnmower again. Plus no more parts on 'her' side of the garage.

Saturday, May 16, 2009

First new parts!

So what if they are the supports for the hatch, I put the first new parts on her today!

I had lots of family obligations today so I only got about an hour and a half of work on the car. First task was to replace the rear hatch struts. Then I removed the interior panels, back seat and took a good inventory of how things look.

I found another rust-through area under the driver's side back seat. This one is a good size so when I clean it up I'll have a good sized hole.

I also crawled underneath and looked around. Not a lot wrong under there. Looks like they bent the transmission support removing the old one, but not too bad.

Weather and family permitting, I am going to start rust-removal tomorrow!

Saturday, May 9, 2009

Mother's day weekend - no time to work on the car!

We had a really busy Saturday playing softball, so I didn't get to work on the Capri at all.

Tomorrow is Mother's day so I don't think Deb will like it if I'm in the garage all the time!

I did get a wiring harness for the car and the rear hatch lift supports so I don't need a piece of pipe to hold the hatch up! I'll install the supports next weekend.

Next weekend I want to finish taking the interior apart and maybe grind the rust out of the hatch "trunk" area. So the body work begins!

Saturday, May 2, 2009

Pictures of the 1980 Capri

I found some pictures of the 1980.

This is August 1986 before I went to college


This is August 1988 before I went back to school. Note the door pin stripe and missing molding. The stock doors had rusted completely. I hadn't gotten the paint fixed. Actually I never got it fixed!


I know there are more of just the car, I just need to find them.

Removing the front clip

It poured last night so the fields were too wet for the last softball games. So, I started taking the front end off the Capri.

Boy what a pain in ass. Deb commented that I hadn't been that filthy as long as she's known me (which isn't true, when the put the motor in the 1980 Capri I was filthy)

It took a couple of hours to get the first fender well unscrewed. Drivers side first. After 25 years this car was really rusty.

After a couple more hours of unscrewing, breaking the heads off bolts and generally making a mess, I got the nose and both fenders off. I only got frustrated a couple of times, so I stopped and took a break. Nice thing about not having to get it together to drive it to work Monday!

I found that the passenger front rim is rusted to the rotor. Banged on it for a few minutes before giving up. One more thing to deal with ;-)

Unfortunately, I found proof of what I've been suspecting since I brought her home: The car was in a front collision at some point. First clue was the engine bay looks like it was pained black, not the blue/gray color of the body. Second as I started unbolting things I found different sized bolts on each side in the same spots.

It looks like it took a hit on the drivers side, since that fender doesn't have the same mounting points for the front spoiler as the passengers. There is also visible damage underneath.

Worse is the rust under the battery tray. See below. One of Courtney's friends is sleeping over tonight and her Dad is a body/paint man. He looked at the rust and said I'd need to cut it out and replace the whole part. Luckily we can get replacement parts for the parts in trouble.

Pictures below.